Friday, September 17, 2010

Big Fat Daddy's Beef Enchiladas

I promised to post this recipe a few weeks ago and got lazy on it.  But here it is, hope you like it:
Start with about a pound of either browned ground beef or shredded pot roast.  Season to taste with Chili Powder, salt, and pepper.  (First trip out, please don't use any of those pre-packaged mixes or "salts".)
As with the Chicken Enchiladas, heat corn tortillas in oil until they are pliable, then roll a spoonful of meat, and one-third of a slice of velveeta or American cheese in the tortilla and place it in a 13X9" pan.  One pound of beef should yield about 12-14 enchiladas.

Mix one six-ounce can of tomato paste with six-ounces of water, add  1/2 teaspoon of salt and a dash of pepper, and about a tablespoon of Chili Powder.  (Depending on your tolerance for pain in your mouth, you can add chilis, tabasco sauce, salsa, or any other spices or flavorings you desire.)  Whip it up good with a whisk and pour over the rolled-up enchiladas;  be sure to cover as evenly as possible.

Spread shredded cheddar cheese over the tops of the enchiladas and sauce (IMHO there can never be too much cheese).  Sprinkle sliced black olives over it all and pop in the oven at 350 degrees.  They shouldn't bake too long, just about fifteen to twenty minutes.  The sauce will be just a little bubbly.  You want the cheese all melted and just a little settled, but not crispy.  Leave it in too long and the bottoms will become tough and hard to cut.  
Once you try it my way, experiment and find what makes you happy;  then you can call it your enchilada recipe !

Thursday, September 2, 2010

Healthy, Packable Foods for School Lunches

I found this list on another site, but I wanted to repost it here for my own reference.....


Healthy, Packable Foods for School Lunches
(and others who eat away from home)
  • Of course, anything from my Healthy Snacks to Go eBook (shameless plug)
  • Cut veggies with dip
    • Veggie ideas:  cherry tomatoes, carrots, pea pods, cucumbers, cauliflower or broccoli spears, celery, fresh green beans, colored peppers,
    • Dip ideas:  hummus, homemade yogurt dip or yogurt cheese dip,ranch dressing, even ketchup if it’ll get them to eat their veggies!
  • Apples and natural peanut butter (kids love to dip!)
    UPDATE: please remember that peanut allergies are very, very serious. The peanut allergen goes airborne, so many who suffer from a peanut allergy cannot even be in the same room as a peanut product. There is a list of substitutes and peanut-free ideas in the comments. If someone in your child’s classroom has an allergy, be sure to protect their health by abstaining from peanuts at school.
  • Frozen peas
  • Homemade yogurt (with frozen fruit and/or granola in it)
    We eat yogurt every day with lunch, and it is packable!  That’s one reason I love my glass storage containers in the 1-cup size.
  • Fresh fruit, whole or cut depending on the child
    • Bananas, oranges, apples, pears, plums, melon, grapes, cherries, strawberries, peaches, nectarines…try to stick with what is more or less in season and watch the Dirty Dozen list.
  • Dried fruit
  • Homemade whole grain muffins/quick breads
  • Hard-boiled egg with salt and pepper (cut in half is easier to handle)
  • Sandwiches (on 100% whole grain bread or homemade):how to pack nutritious lunch healthy
    • Natural peanut butter and raw honey
    • PB and jelly (I made honey-sweetened freezer jam this year; just be sure to watch the ingredients for high-fructose corn syrup if you buy it)
    • PB and banana
    • PB and pickle
    • Leftover roast chicken or turkey
    • Egg salad, chicken salad, or tuna salad (even try canned salmon like tuna if the kids like it)
      Be sure not to serve tuna more than once a week or so because of chemical build-up.
    • Cream cheese and jelly
    • PB and cream cheese
    • Son’s new favorite:  cream cheese with strawberry slices and raw honey (peaches are good too!)
      • I actually use yogurt cheese instead of cream cheese in all of the above sandwiches
    • BLT (low- or no-nitrite bacon is best, regular stuff is a compromise food)
    • Bean spreads (search for recipes that used mashed beans as a sandwich spread – a great way to get protein in without breaking the bank or dealing with lunchmeat nitrites/nitrates)
    • Try making a wrap to switch it up, but watch the tortilla ingredients for trans fats.  I make my own homemade tortillas.
    • Cold burrito or refried beans with guacamole or salsa on a tortilla. (I used to think cold refried beans were gross, but then I realized that people don’t even question eating cold refried beans in so many tex-mex dips with tortilla chips.)
  • Cheese and whole grain crackers or homemade wheat thin crackers
  • Cottage cheese with various mix-ins
  • Homemade “lunchables” – a reader idea from Llama Momma – stack crackers, cheese slices, and meat slices for the child to assemble with apple slices and cream cheese dip.
  • Leftovers that can handle the “thermos” treatment:
    • Homemade soups
    • Homemade mac-n-cheese
    • Many casseroles
    • Spaghetti and other pasta dishes
    • Stir fry with brown rice
    • Of course, heat on the stove before packing in the thermos.  Not that I would use the microwave anyway, but mic’d food just doesn’t hold the heat long enough, no matter what.
  • Potato salad
  • Cold grain salads (GNOWFGLINS has an example; I tried making one with whole spelt and balsamic vinaigrette that was delicious – it’s in both theHealthy Snacks to Go eBook AND the Family Camping Handbook)
  • Cold bean salad (same idea as above – you know me and beans!)
  • Leftover homemade whole wheat pizza
  • Homemade granola bars
  • Homemade applesauce or storebought natural (no sugar) applesauce.  Addcinnamon for your kids to sweeten it up a little without adding a sweetener.  My kids also like cinnamon-applesauce stirred into their yogurt.
Working Moms’ Acceptable Shortcuts (or, Compromise Foods for “Sometimes” Lunches)
  • Natural applesauce single cups
  • Goldfish crackers, only the “Made with Whole Grain” version (they’re very good!) UPDATE: I now know that those Goldfish have MSGs…so…make your own call on that.
  • Pretzels, as long as there isn’t HFCS or trans fats in the ingredients
  • Boxed cereal and milk
  • Canned fruit cups (? Maybe ?)
  • Store granola bars…but be wise about reading ingredients
  • Plain yogurt with fruit in it or organic yogurt cups
  • Pita bread and hummus
  • Lunchmeat, as an occasional thing unless you get nitrate-free meats
  • string cheese and real cheese slices (pre-sliced)
  • There have to be more items for this list…help me out, busy mommies!
Unacceptable items (or, This Counts as Dessert if you Pack It!)
  • Potato chips
  • Lunchables
  • HFCS-laden yogurt cups and Gogurts (sorry, I know kids love these, but they’re not worth it!)
  • “Fruit Snacks” (this stuff is candy!!!)
  • Fruit Roll-ups and similar (see above)
  • Little Debbie anything
  • Pudding cups (is there any “real food” in pudding cups?)
  • Jello cups (ditto)
  • Processed cheese slices or cheese and cracker packages
  • Processed beef jerky
  • Storebought cookies
  • Pop-tarts
  • Pastries, crescent rolls, biscuits from a can (trans fat alert!!)

yummy eggs

Here’s the easy system to eggs-as-quick-as-cereal and the secret ingredient to the fluffiest eggs you’ll ever eat:

Put pan on stove and turn burner on medium heat.
Grab from fridge: butter, eggs, cottage cheese (secret ingredient!) and spinach, if any is washed.
Run stick of butter around pan a few times.
Throw handful of spinach in pan or a few cubes of frozen spinach (optional).
Use spoonula (one of my favorite kitchen gadgets!) to scoop cottage cheese into pan.  (Ratio is about 2-3 Tbs cottage cheese for every two eggs.  This is especially excellent for pregnant women because cottage cheese has a lot of protein, oh-so-important for growing babies.)
Break eggs directly into pan.
Mix with spoonula; turn heat to medium-low.
Continue to stir periodically as eggs cook.
During this time, you get the plates and forks out, put stuff back into the fridge, get toast going, put dishes away from last night’s dinner, coral kiddos into the kitchen…all the stuff you’d usually be doing before or after pouring the milk on the cereal.
Add optional shredded cheese, definitely if you’re expecting (bring on the protein!).
Eat!  Yummy!
Note:  Sometimes the water content of the cottage cheese makes the eggs look a little runny.  Don’t worry, they are fully cooked.  Decrease cottage cheese next time if you don’t like it.

Does this seem crazy?  An 11-step “recipe” for scrambled eggs, for heaven’s sakes?  There are some nuances I want you to notice and appreciate, though, and maybe you won’t think I’m so crazy, just extremely conscious in the kitchen.

Getting everything out of the fridge at once saves steps.  You just need to make sure you know what you need when you open the door.
If you put the cottage cheese in first, you don’t have to use an extra spoon to dip it out, because the spoonula (or spatula) doesn’t have raw egg on it yet.  Plus the cottage cheese gets a chance to melt a bit before meeting the eggs.
Spinach combines with egg yolks to reduce inflammation — you can use frozen spinach too. I just open the box when I get home from the store and the spinach is slightly soft, use a sharp knife to cut it into 1″ chunks, and store in a bag. One or two chunks is great for scrambled eggs; just allow a little time for it to thaw in the pan.
Scrambling in the pan avoids yet another dirty dish.  (Can you tell I hate doing dishes?)
Cooking eggs slowly on low heat just makes them taste better and have better texture.  Thanks to my mom for that one!
UPDATE:  The Schwarzbein Principle books confirm that cooking eggs over low heat is important to preserve the fatty acids in the egg yolk.
If you can rationalize the time it takes for the eggs to cook by doing other need-to-do tasks, making eggs in the morning really doesn’t take any longer than pouring cereal, especially if people have different kinds of cereal and you have to get out multiple boxes.
If you’re using a non-stick pan, my brother would say just wipe it out with a paper towel and use it again the next day!  Apparently avoiding dishes runs in the family (which is funny, because my mom doesn’t seem to mind it).
If you use a cast iron or stainless steel pan, add water right away and bring to a rolling boil – this will release all the cooked on egg junk that is soooo hard to get off later!

The Best Scrambled Eggs Ever | Kitchen Stewardship
URL: http://www.kitchenstewardship.com/2009/04/15/the-best-scrambled-eggs-ever/

yummy broccoli

http://www.amateurgourmet.com/2008/11/the_best_brocco.html


You preheat the oven to 425.
Take 4 to 5 pounds of broccoli (I just got two large bunches), cut into florets (but relatively big ones.) Here's the key that she doesn't mention in the recipe: dry them THOROUGHLY. That is, if you wash them. I saw an episode of Julia Child cooking with Jacques Pepin once when Pepin revealed he doesn't wash a chicken before putting it in a hot oven: "The heat kills all the germs," he said in his French accent. "If bacteria could survive that oven, it deserves to kill me." By that logic, then, I didn't wash my broccoli; I wanted it to get crispy and brown. If you're nervous, though, just wash and dry it obsessively.
Now, it's easy. Put the broccoli on a cookie sheet. Toss with olive oil, salt and pepper. (She says 5 Tbs olive oil, 1 1/2 tsps kosher salt, 1/2 tsp fresh ground pepper, but I just eyeballed it.) Now add 4 garlic cloves that are peeled and sliced and toss them in too.
IMG_2.JPG
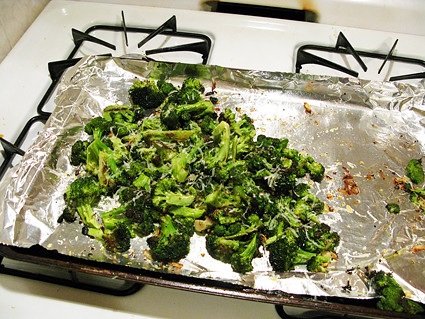
Roast in the oven 20 to 25 minutes, until "crisp-tender and the tips of some of the florets are browned."
I shook the pan around a bit as it went, but not sure that's necessary.
When it's done, take it out of the oven--and here's where it gets really good--zest a lemon over the broccoli, squeeze the lemon juice over the broccoli, add 1.5 Tbs more olive oil, 3 Tbs toasted pine nuts (I left those out), and 1/3 cup of freshly grated Parmesan cheese. She also has you add 2 Tbs julienned fresh basil, but I left that out too.
IMG_3.JPG
You won't miss it: the magic combo of the crispy broccoli, the garlic, the lemon and the cheese will make this the best broccoli of your life. I guarantee it; you will go ga-ga over it. I'm so ga-ga over it that I would seriously consider a trip right now to the store just so I could make this for lunch. Broccoli for lunch? After trying this, you'll never want to eat anything else for breakfast, lunch or dinner ever again.